Installing nginx
From source
1. Download nginx-x.x.x.tar.gz from nginx.org
2. Install build tools

    apt -y install build-essential (ubuntu based)
    yum group install "development tools" (centos based)

3. Install nginx depedencies : apt -y install libpcre3-dev zlib1g-dev libssl-dev

    PCRE (for the HTTP Rewrite module)
    Zlib (for the HTTP Gzip module)
    OpenSSL (for HTTPS protocol support)

4. tar -zxvf nginx-x.x.x.tar.gz
5. cd nginx-x.x.x
6. ./configure
7. make
8. make install

By default, make install will install nginx and all related files into the folder /usr/
local/nginx/. The executable binary for nginx will be located at /usr/local/nginx/sbin/nginx.

For instance, the most common nginx installation would have the nginx binary loca‐
ted in /usr/sbin and the configuration files in /etc/nginx. In order to make this
happen, we’d run the configure script with the following flags:

./configure --prefix=/usr --conf-path=/etc/nginx

One of the benefits of building nginx from source is that you’re able to specify exactly the
modules you want, and which ones you don’t. The downside is that if you don’t include
something that you later need, you’ll have to rebuild nginx from source.
From a package (usually outdated) yum -y install epel-release; yum -y install nginx apt -y install nginx
From nginx.org package (latest version)
wget http://nginx.org/keys/nginx_signing.key
apt-key add nginx_signing.key

lsb_release -a | grep -i codename
Codename:       bionic

cat >> /etc/apt/sources.list
deb http://nginx.org/packages/ubuntu/ bionic nginx
deb-src http://nginx.org/packages/ubuntu/ bionic nginx

apt -y update
apt -y install nginx
Nginx configuration file (nginx.conf)
By default (with empty configuration), nginx will share the contents of the /usr/share/nginx/html directory on port 80. Use nginx -t to determine where is nginx.conf location.
$ ps aux | grep nginx root 24484 0.0 0.0 85772 1312 ? Ss 1:38 0:00 nginx: master process nginx 24485 0.0 0.0 85992 2004 ? S 1:38 0:00 nginx: worker process
On a Linux, only the root user is able to bind to port numbers below port 1024. Because of this, nginx is typically started as root to allow it to bind to port 80 and port 443. The master process reads and executes the nginx configuration, binds the necessary ports, and runs the worker processes. The worker process, running as the user specified in the configuration file, is where incoming HTTP requests are served from.
vim /etc/nginx/nginx.conf
#Sets the unix user and group that the nginx worker processes will run as.
#It’s common practice to set the number of worker processes to the same number CPU cores
#That you have on your machine. The value of auto can be set worker_processes
#To have nginx auto-detect the number of logical CPU cores
user nginx;
worker_processes auto;
#The events context is used to configure parts of the connection processing part of nginx.
#There can only ever be one events context and it must be in the main context
#The worker_connections directive sets the maximum number of simultaneous con‐
#nections that can be opened by each worker process. The default is 512 connections
#Per worker process
#On Linux, each connection is counts as an open file, and there is an operating system
#Limit on the maximum number of open files allowed per process. If you decide increase-
#This value, you’ll need to also increase the maximum number of open files allowed.
events {
worker_connections 512;
}
#The server context can only ever be specified within the HTTP context, and the
#HTTP context must always be part of the main context.
#Below configuration is HTTP server to listen on port 80 of every network interface
#You can make server to listen on two differents port
#It’s possible to override index file and specify your own default index (e.g:maintenance page)
http {
server {
listen *:80;
#listen *:443 ssl;
server_name "darin.web.id";
root /var/www/html;
access_log /var/log/nginx/darin.web.id_access.log;
error_log /var/log/nginx/darin.web.id_error.log;
#index maintenance.html backup-maintenance.html;
#index different-index.html;
index index.html index.htm;
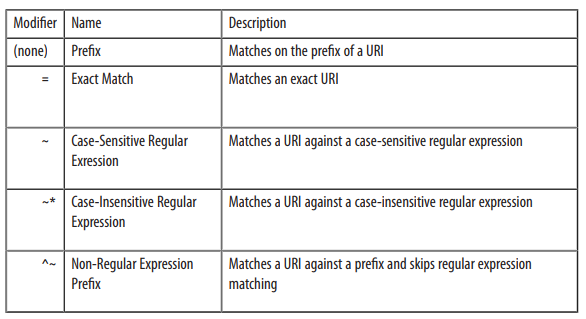
#Basic location block syntax examples :
## location optional_modifier uri_matcher {
## configuration_directives
## }
#Direct access https://darin.web.id/file to dir /var/www/html/
#Direct access https://darin.web.id/blog/file to dir /home/darin/blog/
#Really direct access https://darin.web.id/images/file to dir /home/darin/images/
location / {
#custom error page with html
error_page 404 /404.html;
error_page 500 502 503 504 /50x.html;
root /var/www/html/;
}
location /blog/ {
root /home/darin/;
#check the existence of file.
#if not found, show http error 404
#try_files maintenance.html index.html =404;
}
location /images/ {
alias /home/darin/images/;
}
#When there are overlapping prefix location blocks, the most specific match is used.
#Because regular expression are more processor intensive to process and match
#Against, use them only when necessary! It will always be faster to process a location
#Block that uses prefixes than one that uses regular expressions.
#Regular Expression Location Blocks examples :
## Case-sensitive
## location ~ \.(gif|jpg)$ {
## ...
## }
## Case-insensitive
## location ~* \.(gif|jpg)$ {
## ...
## }
}
}
Hide nginx version
Just add server_tokens off; in nginx config file
Location block selection algorithm
Management process of nginx
Validity the configuration : nginx -t Reload nginx configuration (w/h stop existing process): nginx -s reload Find out pid process of nginx : cat /var/run/nginx.pid
Reference : NGINX_A_Practical_Guide_Preview_Edition.pdf