Introduction
- Proxmox VE is a platform to run Virtual Machines and Containers.
- Its based on Debian Linux and completely Open Source.
- Proxmox implement two virtualization technology, KVM and LXC (container-based virtualization). Proxmox VE can be used on a single or cluster nodes. All management tasks can be done using web-based management interface (based on JavaScript Framework Ex-tJS).
- Proxmox uses a RESTful API based on JSON as primary data format for fast integration with third party.
- Proxmox uses the unique Proxmox Cluster File System (pmxcfs), a database-driven file system for storing configuration files. This enables you to store the configuration of thousands of virtualmachines. By using corosync, the files are replicated in real time on all cluster nodes.
- Proxmox implement role-based administration which can be used to define access for all objects (VMs, Storage, nodes, etc). This allows user to define privileges of any objects (ACL concepts). Each permission specifies a subject (a user or group) and a role (set of privileges) on a specific path.
- Proxmox has the integrated backup tool (vzdump) for creates consistent snapshots of running Containers and KVM guests. It basically creates an archive of the VM or CT data which includes the VM/CT configuration files. The new backup format is optimized for storing VM backups fast and effective (sparse files, out of order data, minimized I/O).
- Proxmox has the integrated firewall allows you to filter network packets on any VM or Container interface. Common sets of firewall rules can be grouped into “security groups”.
- The Proxmox VE cluster stack itself relies heavily on the fact that all the nodes have precisely synchronized time. Time synchronization between nodes can be achieved with the “Network Time Protocol” (NTP). Proxmox VE uses systemd-timesyncd as NTP client by default, preconfigured to use a set of public servers. This setup works out of the box in most cases (file /etc/systemd/timesyncd.conf for custom NTP server).
- Proxmox install two boot loaders by default. The first partition contains the standard GRUB boot loader. The second partition is an EFI System Partition (ESP), which makes it possible to boot on EFI systems.
- The Proxmox VE installation CD offers several options for local disk management, and the current default setup uses LVM. The installer let you select a single disk for such setup, and uses that disk as physical volume for the Volume Group (VG) pve.
/ (root) : formatted as ext4, and contains the operation system
swap : swap partition
data : This volume uses LVM-thin, and is used to store VM images.
LVM-thin is preferable for this task, because it offers efficient support for snapshots and clones.
Certificate management
Each Proxmox VE cluster creates its own internal Certificate Authority (CA) and generates a self-signed certificate for each node. These certificates are used for encrypted communication with the cluster’s pveproxy service and the Shell/Console feature if SPICE is used. See how to replace proxmox self-signed certificate
Storage Support
- Proxmox VE storage model is very flexible. Virtual machine images can either be stored on one or several local storages or on shared storage like NFS. There are no limits, you may configure as many storage definitions as you like. You can use all storage technologies available for Debian Linux.
- One major benefit of storing VMs on shared storage is the ability to live-migrate running machines without any downtime, as all nodes in the cluster have direct access to VM disk images.
- Supported network storage types : LVM Group, iSCSI target, NFS, CIFS, Ceph RBD, GlusterFS.
- Supported local storage types : LVM Group (local backing devices like block devices, FC devices, DRBD, etc), Directory (storage on existing filesystem), and ZFS.
Installing Proxmox VE
Wiki, On Debian Stretch Minimum Requirements for Evaluation
- CPU: 64bit (Intel EMT64 or AMD64).
- Intel VT/AMD-V capable CPU/Mainboard for KVM Full Virtualization support.
- RAM: 1 GB RAM, plus additional RAM used for guests.
- Hard drive and one NIC.
Recommended System Requirements
- CPU: 64bit (Intel EMT64 or AMD64), Multi core CPU recommended.
- Intel VT/AMD-V capable CPU/Mainboard for KVM Full Virtualization support.
- RAM: 8 GB RAM, plus additional RAM used for guests,
- Hardware RAID with batteries protected write cache (“BBU”) or flash based protection.
- Fast hard drives, best results with 15k rpm SAS, Raid10.
- At least two NICs, depending on the used storage technology you need more.
Proxmox VE repository is based on the famous Debian Linux distribution. That means that you have access to the whole world of Debian packages. A standard Proxmox VE installation uses the default repositories from Debian, so you get bug fixes and security updates through that channel.
/etc/apt/sources.list (default)
deb http://ftp.debian.org/debian stretch main contrib
deb http://security.debian.org stretch/updates main contrib
/etc/apt/sources.list (with non subscription)
deb http://ftp.debian.org/debian stretch main contrib
deb http://security.debian.org stretch/updates main contrib
deb http://download.proxmox.com/debian/pve stretch pve-no-subscription
#deb http://download.proxmox.com/debian/pve stretch pvetest
/etc/apt/sources.list.d/pve-enterprise.list (subscription user)
deb https://enterprise.proxmox.com/debian/pve stretch pve-enterpriseNetworking Model
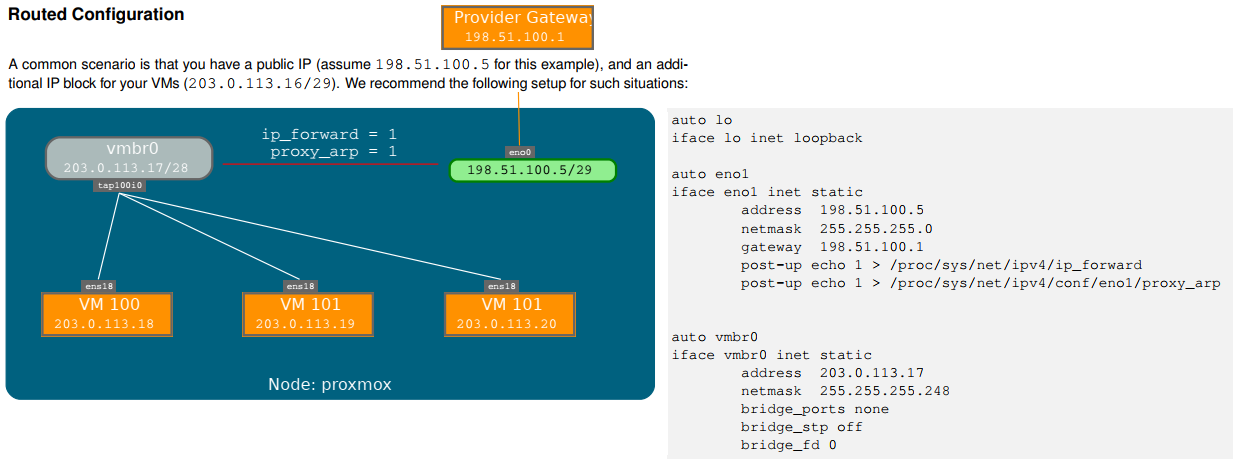
- Proxmox VE uses a bridged, routed, or masquerading networking setup.
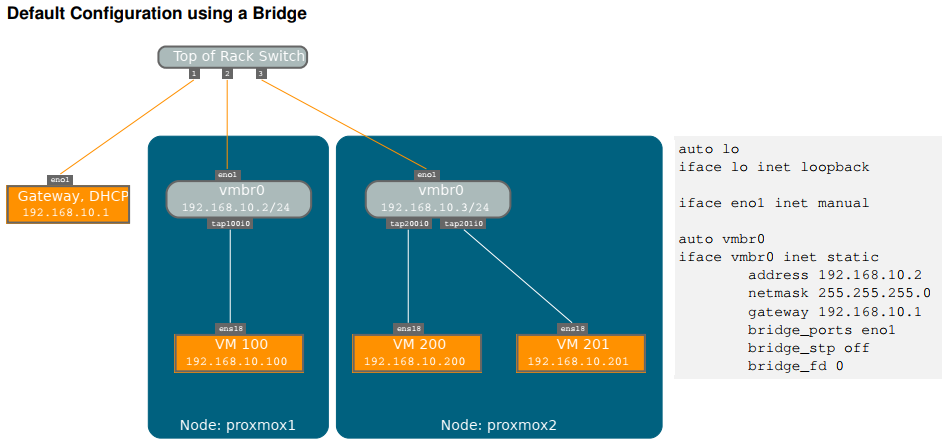
- As default, Proxmox VE uses a bridged networking model. All VMs can share one bridge as if virtual network cables from each guest were all plugged into the same switch. For connecting VMs to the outside world, bridges are attached to physical network cards assigned a TCP/IP configuration. Each host can have up to 4094 bridges.
- Network configuration can be done either via the GUI, or by manually editing the file /etc/network/interfaces, which contains the whole network configuration.
- Proxmox VE does not write changes directly to /etc/network/interfaces. Instead, we write into a temporary file called /etc/network/interfaces.new, and commit those changes when you reboot the node.
 Masquerading (NAT) with iptables
auto lo
iface lo inet loopback

#real IP address
auto eno1
iface eno1 inet static
    address 198.51.100.5
    netmask 255.255.255.0
    gateway 198.51.100.1

#private sub network
auto  vmbr0
iface vmbr0 inet static
    address 10.10.10.1
    netmask 255.255.255.0
    bridge_ports none
    bridge_stp off
    bridge_fd 0

    post-up echo 1 > /proc/sys/net/ipv4/ip_forward
    post-up iptables -t nat -A POSTROUTING -s ’10.10.10.0/24’ -o eno1 --j MASQUERADE
    post-down iptables -t nat -D POSTROUTING -s ’10.10.10.0/24’ -o eno1 --j MASQUERADE