Introduction
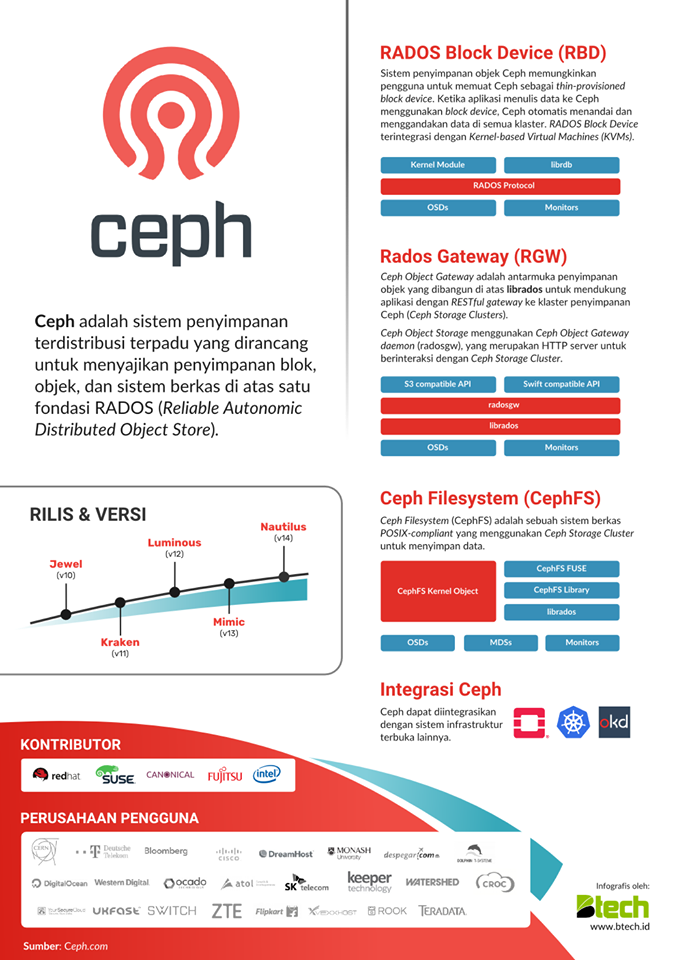
Ceph is an open source software designed to provide object, block, and file storage on the foundation of RADOS (Reliable Autonomic Distributed Object Store). Ceph Storage Clusters are designed to run on hardware using the CRUSH algorithm (Controlled Replication Under Scalable Hashing) to ensure data is distributed evenly across clusters and all cluster nodes can retrieve data quickly without interruption.
Source image : btech.id
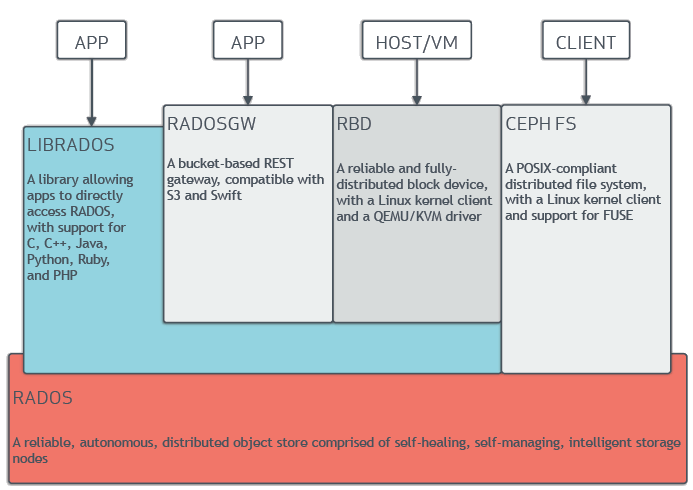
 Source image : ceph documentation
All Ceph storage cluster deployments begin with setting up each Ceph node, your network, and the Ceph storage cluster. A Ceph storage cluster requires at least :
- Ceph monitor (ceph-mon) : maintains maps of the cluster state.
- Ceph manager (ceph-mgr) : keeping track of runtime metrics and the current state of the Ceph cluster, including storage utilization, current performance metrics, and system load.
- Ceph object storage daemon (ceph-osd) : stores data, handles data replication, recovery, rebalancing, and provides some monitoring information to Ceph Monitors and Managers by checking other Ceph OSD Daemons for a heartbeat.
- The Ceph Metadata Server is also required when running Ceph Filesystem clients (ceph-mds) : stores metadata on behalf of the Ceph Filesystem.
Ceph stores data as objects within logical storage pools. Using the CRUSH algorithm, Ceph calculates which placement group should contain the object, and further calculates which Ceph OSD Daemon should store the placement group. The CRUSH algorithm enables the Ceph Storage Cluster to scale, rebalance,and recover dynamically.
Hardware recommendations : http://docs.ceph.com/docs/master/start/hardware-recommendations/ . OS recommendations : http://docs.ceph.com/docs/master/start/os-recommendations/ .
Ceph installation methods :
- Using ceph-deploy 1.1. PREFLIGHT 1.2. STORAGE CLUSTER 1.3. CEPH CLIENT(S)
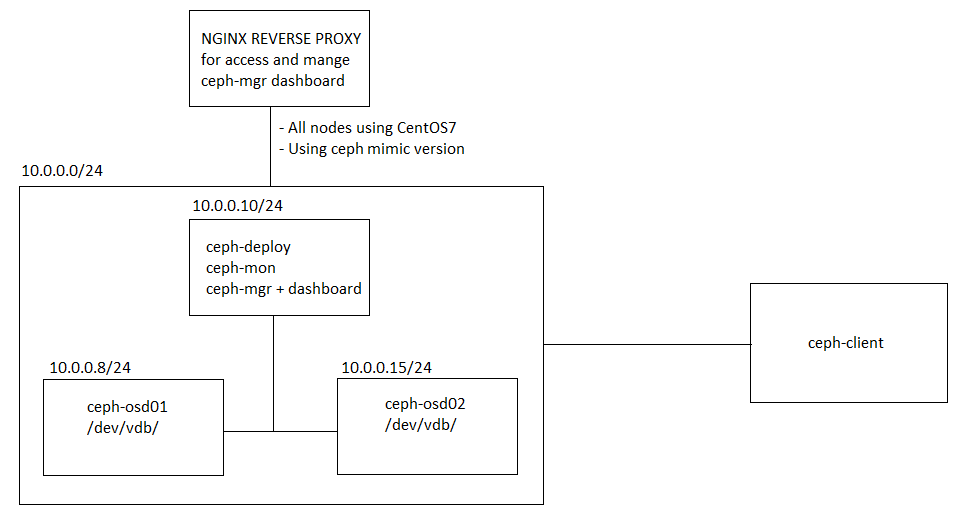
Ceph-deploy basic lab topology
WorkstepsPreflight section
- Login to all nodes with root access.
- Update & upgrade system.
- Install repository.
yum -y install epel-release wget vim screen crudini wget https://download.ceph.com/rpm-luminous/el7/noarch/ceph-release-1-1.el7.noarch.rpm rpm -Uvh ceph-release-1-1.el7.noarch.rpm yum repolist; yum -y update - Setup NTP Client and disable firewall
yum -y install chrony systemctl enable chronyd.service systemctl restart chronyd.service systemctl stop firewalld.service systemctl disable firewalld.service - Setup /etc/hosts
cat >> /etc/hosts 10.0.0.10 ceph-mon 10.0.0.8 ceph-osd01 10.0.0.15 ceph-osd02 - Adding cephuser with sudo access for cluster setup. Using root is not recommended.
cat >> /etc/sudoers.d/cephuser
cephuser ALL = (root) NOPASSWD:ALL
Defaults:cephuser !requiretty
useradd -d /home/cephuser -m cephuser passwd cephuserchmod 0440 /etc/sudoers.d/cephuser setenforce 0 sed -i 's/SELINUX\=enforcing/SELINUX\=permissive/g' /etc/selinux/config - Allow ssh service with local user login.
- Exit from osd nodes, just execute in ceph-mon nodes.
- Install ceph-deploy : yum -y install http://mirror.centos.org/centos/7/os/x86_64/Packages/python-setuptools-0.9.8-7.el7.noarch.rpm ceph-deploy
- Generate ssh-keys for cephuser from ceph-mon nodes and distribute to all nodes for ssh login without password.
su cephuser ssh-keygen -t rsa ssh-copy-id -i ~/.ssh/id_rsa.pub 10.0.0.10 ssh-copy-id -i ~/.ssh/id_rsa.pub 10.0.0.8 ssh-copy-id -i ~/.ssh/id_rsa.pub 10.0.0.15 - Modify the ~/.ssh/config file of your ceph-mon so that ceph-deploy can log in to Ceph nodes as the user you created without requiring you to specify --username {username} each time you execute ceph-deploy.
cat > ~/.ssh/config
#
Host ceph-mon
Hostname ceph-mon
User cephuser
#
Host ceph-osd01
Hostname ceph-osd01
User cephuser
#
Host ceph-osd2
Hostname ceph-osd2
User cephuser
chmod 644 ~/.ssh/config - Ensure connectivity/test ssh login from ceph-mon to all nodes.
Storage cluster section
- Login to ceph-mon with user cephuser : su cephuser
- Create directory for cluster setup
cd /home/cephuser/ mkdir cluster cd cluster - Create the cluster
#Do not call ceph-deploy with sudo or run it as root if you are logged in as a different user #Because it will not issue sudo commands needed on the remote host. #Check the output of ceph-deploy with ls and cat in the current directory #You should see a Ceph configuration file, a monitor secret keyring, and a log file for the new cluster ceph-deploy new ceph-mon; ls -larth drwx------ 4 cephuser cephuser 113 May 13 05:31 .. -rw------- 1 cephuser cephuser 73 May 13 05:31 ceph.mon.keyring -rw-rw-r-- 1 cephuser cephuser 195 May 13 05:31 ceph.conf -rw-rw-r-- 1 cephuser cephuser 3.0K May 13 05:31 ceph-deploy-ceph.log drwxrwxr-x 2 cephuser cephuser 75 May 13 05:31 . - Configure the ceph.conf : vim ceph.conf
[global] fsid = xxxxxxxx mon_initial_members = ceph-mon mon_host = 10.0.0.10 auth_cluster_required = cephx auth_service_required = cephx auth_client_required = cephx public_network = 10.0.0.0/24 #add-public-network osd pool default size = 2 #setup-default-replicas-to-use-2-osd - Install ceph to all nodes
ceph-deploy install ceph-mon ceph-deploy install ceph-osd01 ceph-deploy install ceph-osd02 ceph --version - Add the initial monitor(s) and gather the keys:
ceph-deploy mon create-initial; ls -lah total 604K -rw------- 1 cephuser cephuser 73 May 13 05:31 ceph.mon.keyring -rw-rw-r-- 1 cephuser cephuser 306 May 13 05:33 ceph.conf -rw------- 1 cephuser cephuser 151 May 13 05:47 ceph.client.admin.keyring -rw------- 1 cephuser cephuser 113 May 13 05:47 ceph.bootstrap-mds.keyring -rw------- 1 cephuser cephuser 113 May 13 05:47 ceph.bootstrap-mgr.keyring -rw------- 1 cephuser cephuser 113 May 13 05:47 ceph.bootstrap-osd.keyring -rw------- 1 cephuser cephuser 113 May 13 05:47 ceph.bootstrap-rgw.keyring -rw-rw-r-- 1 cephuser cephuser 334K May 13 05:47 ceph-deploy-ceph.log - Add OSD with specific disks
ceph-deploy disk list ceph-osd01 ceph-deploy disk list ceph-osd02 ceph-deploy osd create --data /dev/vdb ceph-osd01 ceph-deploy osd create --data /dev/vdb ceph-osd02 - Copy key and configuration to all nodes
ceph-deploy admin ceph-mon ceph-osd01 ceph-osd02 - Set permission
sudo chmod +r /etc/ceph/ceph.client.admin.keyring - Deploy a ceph-mgr daemon
ceph-deploy mgr create ceph-mon - Verification
ceph health
ceph health detail
ceph df
ceph status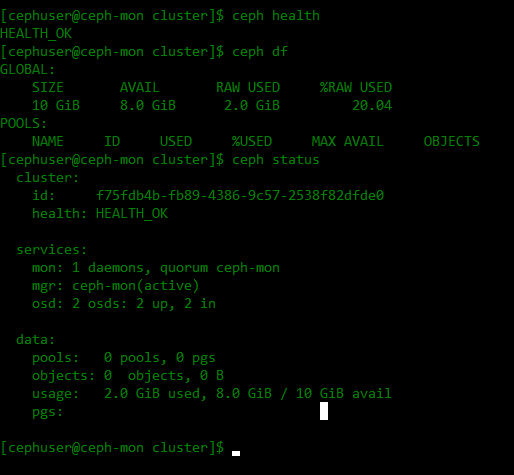
Storage cluster section 2.0Expanding, adding ceph metadata server to ceph-monAdding ceph-mon and ceph-mgr to other nodes
ceph-deploy mds create ceph-mon #for using cephfs
ceph-deploy mon add ceph-osd01
ceph-deploy mon add ceph-osd02
ceph quorum_status --format json-pretty
ceph-deploy mgr create ceph-osd01 ceph-osd02
Storing/Retrieving Object Data
#It is mandatory to choose the value of pg_num because it cannot be calculated automatically.
#Here are a few values commonly used:
#Less than 5 OSDs set pg_num to 128
#Between 5 and 10 OSDs set pg_num to 512
#Between 10 and 50 OSDs set pg_num to 1024
#If you have more than 50 OSDs, you need to understand the tradeoffs and how to calculate the pg_num value by yourself
#For calculating pg_num value by yourself please take help of pgcalc tool
ceph osd create [pool-name] [pg-number]
ceph osd create 1stpool 128
ceph osd pool stats 1stpool
ceph osd pool application enable 1stpool rbd #giving pool tags
#rados put {object-name} {file-path} --pool=[pool-name]
echo "hello, world" > 1stfile.txt
cp 1stfile.txt 2ndfile.txt
cp 1stfile.txt 3rdfile.txt
rados put 1stfile 1stfile.txt --pool=1stpool
rados put 2ndfile 2ndfile.txt --pool=1stpool
rados put 3rdfile 3rdfile.txt --pool=1stpool
rados -p 1stpool ls
#
1stfile
2ndfile
3rdfile
#Identify object location
ceph osd map {pool-name} {object-name}
ceph osd map 1stpool 1stfile
osdmap e14 pool '1stpool' (1) object '1stfile' -> pg 1.775e8b28 (1.28) -> up ([1,0], p1) acting ([1,0], p1)
#Remove object : rados rm [object-name] --pool=[pool-name]
#Remove pool : ceph osd pool rm [pool-name]Additional, starting over
If at any point you run into trouble and you want to start over, execute the following to purge the Ceph packages, and erase all its data and configuration:
ceph-deploy purge {ceph-node} [{ceph-node}]
ceph-deploy purgedata {ceph-node} [{ceph-node}]
ceph-deploy forgetkeys
rm ceph.*
Additional, enabling ceph-mgr dashboard
ceph mgr module enable dashboard #on ceph-mon
ceph dashboard create-self-signed-cert #or you can create one yourself
ceph dashboard set-login-credentials [username] [password]
ceph mgr services #view dashboard url
Reference : http://docs.ceph.com/docs/mimic/start/ .